
If you’re looking to create more definition in your curly hair, brush styling might be just the thing for you. Using a brush smooths your strands while distributing your styler, and with the right tension, it can help create bouncy, defined curls. Below are a few different ways to achieve this!
What brush should I use for brush styling curls?
You can try with any brush you already own, but there are definitely some popular models among the curly community.
Denman D3 brush: This brush is great for “classic” brush styling as well as brush coiling, as the smooth shape helps the hair glide easily around the handle. You can also remove bristles for a chunkier curl effect.

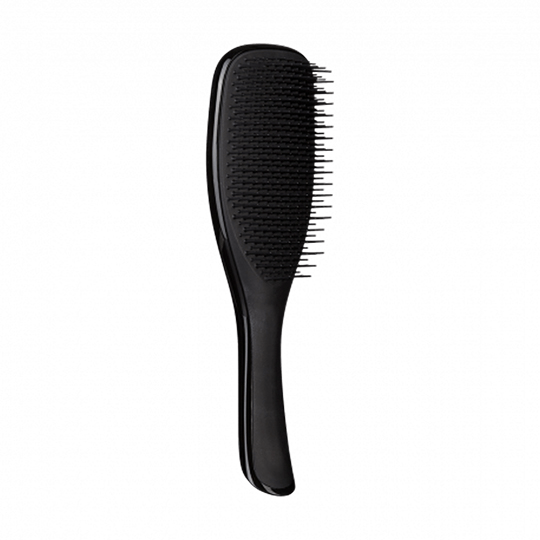
Tangle Teezer Ultimate Detangler: This has the added benefit of being good for detangling on wet or dry hair! Its two-tiered teeth make it great for smoothing your sections and ensuring your product is well distributed.
Boar bristle brush: This is better for creating bigger, chunkier curl clumps. The boar bristles grab all of your strands, smoothing the hair as you brush. I like this one from No Knot Co or Rock and Ruddle do some lovely designs with a vegan option if desired. Get 15% off the Rock and Ruddle website with code CURLSBYTHECOAST15.

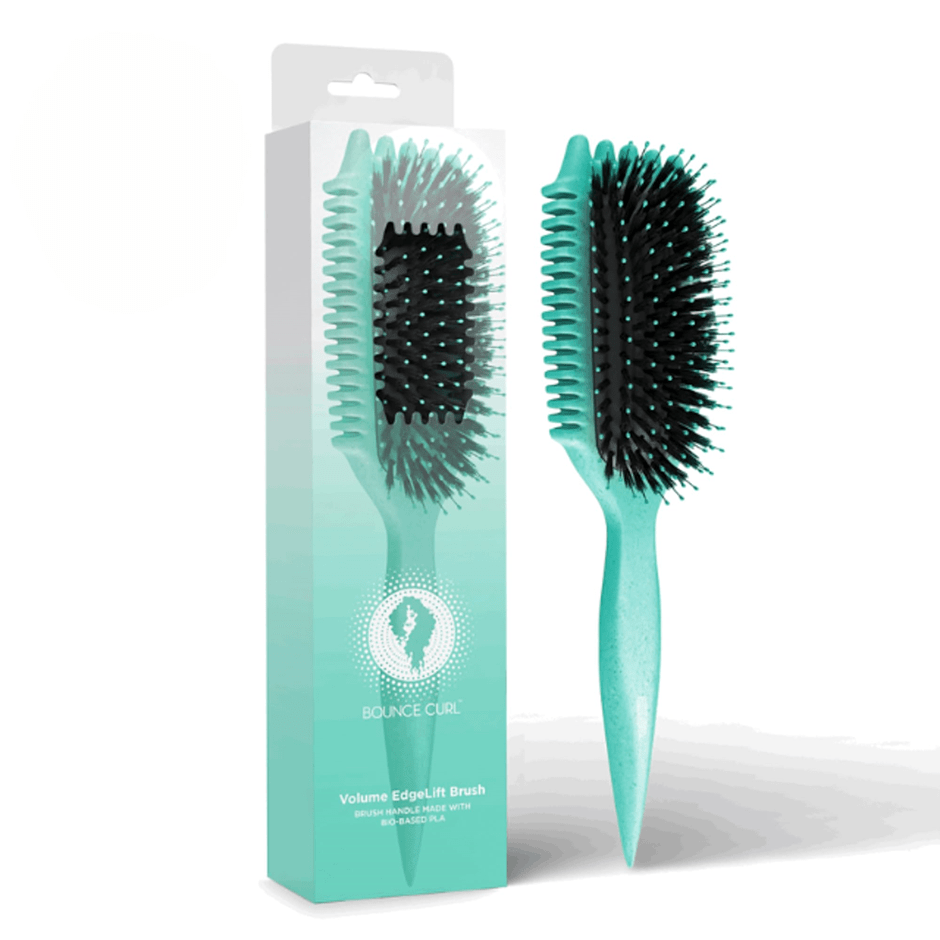
Bounce Curl Define EdgeLift Brush: A relatively new model that has already gained a lot of hype, this brush grabs your strands like a boar bristle brush, but has scalloped edges for separating your curls as you brush. Get 10% off the Bounce Curl website with code CURLSBYTHECOAST10, or buy it through their international stockists if you’re outside of the US.
What products do I use while brush styling?
You can use any stylers with brush styling, as long as your final product has some hold so that the curls don’t drop out as soon as they’re dry.
You could perhaps rake in a little curl cream, do your brush styling, then scrunch in some gel after, or rake in your main hold styler (e.g. gel), brush style, then glaze and scrunch a little bit more of the same styler after. Or, you could glaze and scrunch some foam or mousse after for a little added volume. Play around with combinations and see what works for you!
Sectioning your hair
It’s easier to section your hair while brush styling, but the number of sections you do depends on how thick your hair is. I tend to do 3 horizontal sections – splitting my hair above the ears and diagonally from my eyebrows. I’ll then do some smaller sections perpendicular to my parting for my roots (see below for styling the roots).
Classic brush styling: brushing with tension
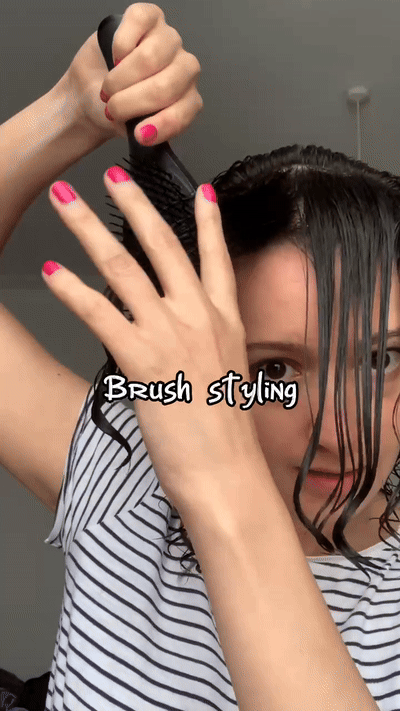
The most basic way to brush style is to brush with tension:
1. Take a section of hair and place your brush close to the roots. You can either brush horizontally, in which case you’d place your brush under the section of hair, or vertically, in which case you’d place the brush behind your section (or in front if your curls curl towards your face).
2. Twist the brush away from your head as you start to move the brush down the section, and for more tension, lay your finger along the side of the brush to trap the hair under it. Think of it as curling a ribbon with scissors!
3. When you get to the end, release the brush give the curl clump a little shake or scrunch, and the curl should form!
Once you’ve got the hang of this, it doesn’t take long at all, and you can experiment with doing it in bigger or smaller sections to see how it affects your results. My favourite method is to just brush my hair upside down, all in one go! I call this lazy brush styling 😆
Brush coiling: for even more curl definition
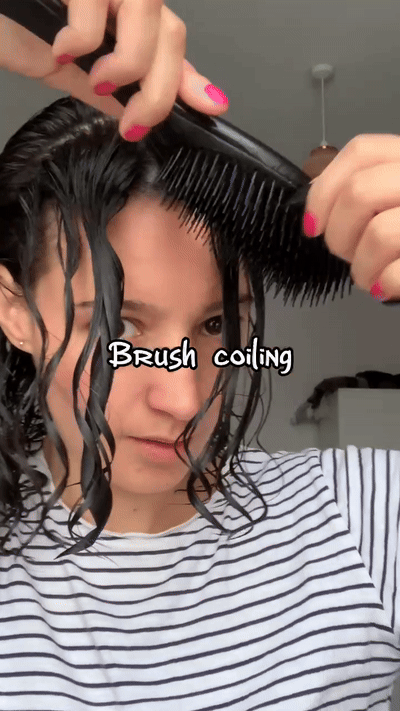
This one is a little fiddlier, but the payoff is hopefully even more ringletty results. It’s worth remembering that this method will only be as effective as your natural curl pattern: if your hair has looser waves, it is not going to necessarily create tight coils for you!
1. Place your brush at the top of your section, with the brush handle pointing upwards.
2. As you move the brush downwards, twist the brush away from the hair strand and allow the hair to twist around the handle.
3. Keep twisting around the handle (holding the main part of the brush) until the entire strand has been twisted around it, and let the last of the strand slip off the handle. Boing!
Brush and shake: for a volume boost and great curl separation
I love using this method on my roots, to make sure my hair doesn’t clump into one big curl. The separation that this achieves will help your volume!
1. Start with a classic brush style motion: brush your hair with tension and twist the brush away as you go.
2. When the brush is near the end of your hair, shake the brush while the strands are still attached to the brush.
3. Pull the brush free, and scrunch.
Brush styling your roots: for added lift and volume
When you get to your roots, it’s easy to accidentally flatten your curls when using a brush. For the best chance of root lift, be sure that you’re pulling the brush upwards and away from your roots. If you have a strong parting, try drawing your sections in the opposite direction to your parting (so drawing horizontal lines instead of following the lines of your parting). Don’t forget the back of your head, too!
Once you’ve got the hang of the mechanics of brush styling, there are endless combinations to try that could all give you different results. Try brush styling with different brushes, product combinations, and big or small sections, and see which curly look you love best!
If you want more visual aids to help you brush style, check out my Instagram posts on how to brush style, my lazy brush styling technique, and comparing the results of 4 different brushes!

Share your thoughts…